 Previous | Index | Next Previous | Index | Next 
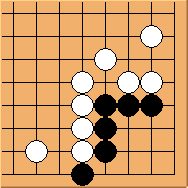
Diagram 9.1: White to play
We will not consider the Carpenter's corner with one extra liberty as well as one first-line stone.
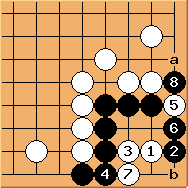
Diagram 9.2: Solution 1
First shown here is the solution on a number of textbooks.
From Shape 8, we already know that  is the only move. is the only move.
 should attach from the side without the first-line hane.
After should attach from the side without the first-line hane.
After  the result is a so-called 10000-year ko. White does not have to form the ko immediately.
At a later time white can make 'a'/ the result is a so-called 10000-year ko. White does not have to form the ko immediately.
At a later time white can make 'a'/ exchange first, before throwing in 'b' to form the ko. Even after that
black can ignore, and white has to play three extra moves to make it a
real ko! exchange first, before throwing in 'b' to form the ko. Even after that
black can ignore, and white has to play three extra moves to make it a
real ko!
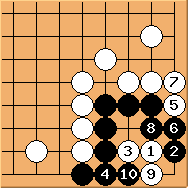
Diagram 9.3: Seki
This is sometimes described as a failure for white.
If white connects at  ,the corner results in seki.
However if we take into account that the hope of winning the 10000-year ko in Diagram 9.2 is very remote for white,
and white has already sealed the right side by in this diagram,
this seki is not necessarily worse than the 10000-year ko situation. ,the corner results in seki.
However if we take into account that the hope of winning the 10000-year ko in Diagram 9.2 is very remote for white,
and white has already sealed the right side by in this diagram,
this seki is not necessarily worse than the 10000-year ko situation.
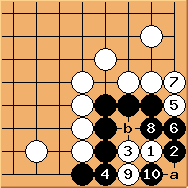
Diagram 9.4: White fails
White cannot play  .
Thanks to the extra liberty, black is able to use 'oshi-tsubushi' tesuji at 'b' to kill white. .
Thanks to the extra liberty, black is able to use 'oshi-tsubushi' tesuji at 'b' to kill white.
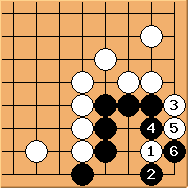
Diagram 9.5: Black fails
If attaches the wrong side, white can follow the normal Carpenter's Square solution.
That would be a big failure for black.
Two external liberties:
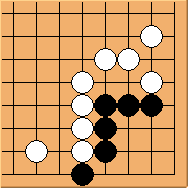
Diagram 9.6: Two external liberties
The original series of Chinese articles did not include this case. But it is rather interesting.
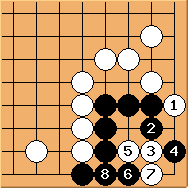
Diagram 9.7: White should be satisfied
The solution in Diagram 9.2 still applies.
But because of even more extra liberties, white is practically hopeless to win the 10000-year ko.
This diagram shows an easy sequence for white to form a seki, destroying black's potential territory in sente.
White must feel happy with this result.
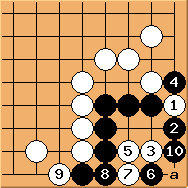
Diagram 9.8: 11=a, still a 10000-year ko
If black blocks at , things become much trickier. There are a lot of room in this corner and many variations.
The given sequence here results in 10000-year ko again (more like a seki).
Note that because black's many external liberties, white's strategy is quite different now.
White needs to: (1) avoid forming an eye now; (2) be careful with 'oshi-tsubushi'.
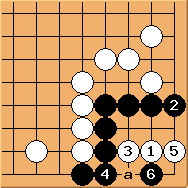
Diagram 9.9: seki (white in sente)
was not even considered in many shapes we discussed earlier.
But now it is not only possible, but gives rather good results for black.
 again is to maintain as much eyespace as possible in the corner.
wants to settle peacefully. again is to maintain as much eyespace as possible in the corner.
wants to settle peacefully.  is a tesuji.
Because of the external liberties, white cannot play 'a'.
Black would play 'a' whenever white reduces its liberties from outside, to form a seki in the corner. is a tesuji.
Because of the external liberties, white cannot play 'a'.
Black would play 'a' whenever white reduces its liberties from outside, to form a seki in the corner.
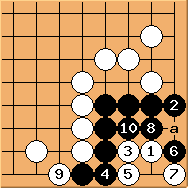
Diagram 9.10: approach Ko
Not happy with the previous diagram, white wants to force a ko by and .
But instead of connecting at 'a' to form a 10000-year ko (which ends in seki 99.9999...% times),
black can play to form an approach ko to kill white.
With two external liberties this is not dangerous to do at all.
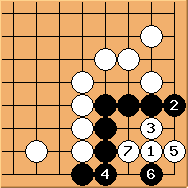
Diagram 9.11: seki (white gote)
Finally if white play  , the corner still ends up in seki. But note that white is gote here.
In comparison to Diagram 9.9 this is considered a failure for white. , the corner still ends up in seki. But note that white is gote here.
In comparison to Diagram 9.9 this is considered a failure for white.
To summarise: the extra liberties change things significantly and both sides need to adjust their strategies.
There are many ways to form seki or 10000-year ko. In practice, such corners can be considered alive,
but with little or no points when making positional judgement.
Previous | Index | Next
|