 Previous | Index | Next Previous | Index | Next 
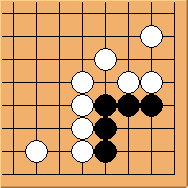
Diagram 8.1: White to play
Now we will consider a Carpenter's Square with one external liberty.
This generally limits the number of options available to the attacking side.
For example, Diagram 3.5 and Diagram 6.3 would stop working for white.
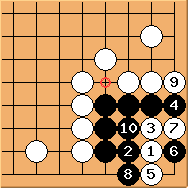
Diagram 8.2: White fails
 is now the only valid attack. Black is able to simply play is now the only valid attack. Black is able to simply play  .
With .
With  , ,  no longer works as black has one more liberty even without an eye. no longer works as black has one more liberty even without an eye.
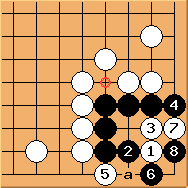
Diagram 8.3: Solution 1
is the proper adjustment. The result is a ko fight.
Note that  cannot block at 'a', otherwise cannot block at 'a', otherwise  would kill the corner in Bulky Five. would kill the corner in Bulky Five.
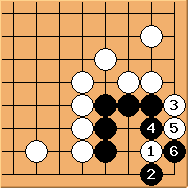
Diagram 8.4: Solution 2
Of course black may continue to use attachment, the standard Carpenter's Square solution,
which results in a ko fight that one can argue is slightly better than Diagram 8.3 - if black wins the ko there is some extra yose benefit.
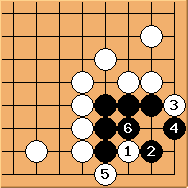
Diagram 8.5: White fails
With the extra liberty outside, white no longer has the option to start attacking from .
For example, this diagram shows that black can play now to save the corner.

Diagram 8.6: White fails too
no longer works either. bend is now possible.
To summarise: the extra liberty serves to limit white's options but also simplifies the situation.
If white plays properly the result is still a ko fight. Note that many variations involving Eye vs.
No Eye capturing race (such as Diagram 3.3, 4.3, 4.8, 4.9, 5.5, 6.6) would result in black's avour.
Previous | Index | Next
|