| All you need to know about Carpenter's Square-24 |
|---|
 Previous | Index | Next Previous | Index | Next   Diagram 24.1: White to play The extra external liberty makes a lot of difference. What's the best strategy for white? 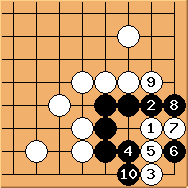 Diagram 24.2: White fails We've in fact covered everything we need to know in Shape 23 already. First of all, as shown here, the solution for Shape 23 (Diagram 23.9) no longer works because of the extra liberty. 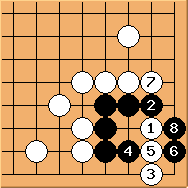 Diagram 24.3: Seki Because 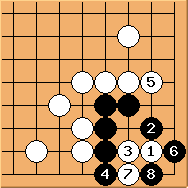 Diagram 24.4: Solution 1 By examining the options in Shape 23, it is clear that Diagram 23.4 (repeated here) is the best possible outcome.
White can be satisfied that the ko is confined in the corner and 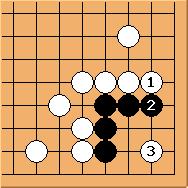 Diagram 24.5: Solution 2 Alternatively, white can choose to form a standard Carpenter's Square, which has been covered in details in Shape 8. 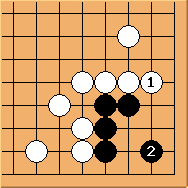 Diagram 24.6: Variation
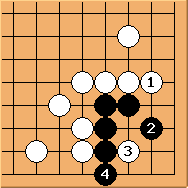 Diagram 24.7: Variation
Conclusion: with the extra liberty black will not die unconditionally. White can choose from a number of ways to create direct kos. Previous | Index | Next |
 in the previous diagram doesn't work, white has to settle in a seki now,
which is a big failure considering ko solutions are available.
in the previous diagram doesn't work, white has to settle in a seki now,
which is a big failure considering ko solutions are available. , a big yose move, is played in sente.
 is also possible. This will be discussed in Shape 28.
Just for your information this also results in a ko fight.
is also possible. This will be discussed in Shape 28.
Just for your information this also results in a ko fight.