 Previous | Index | Next Previous | Index | Next 
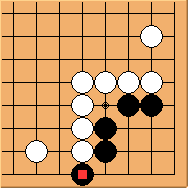
Diagram 13.1: White to play
Does the hane at first line help black?
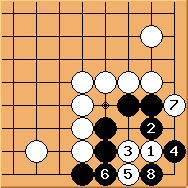
Diagram 13.2: Solution
 is correct.
Because of the hane at first line, black has the leisure to play at key point is correct.
Because of the hane at first line, black has the leisure to play at key point  , resulting in a ko fight. , resulting in a ko fight.
 may play may play  first, getting exactly the same result. first, getting exactly the same result.
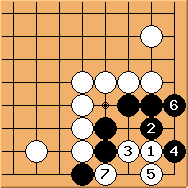
Diagram 13.3: White not good
 can also create a ko fight.
However black gets to take the ko first so this result is considered a failure for white. can also create a ko fight.
However black gets to take the ko first so this result is considered a failure for white.
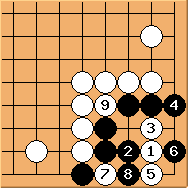
Diagram 13.4: Black fails
 in this diagram is at the wrong side. in this diagram is at the wrong side.
 may also play may also play  directly.
In any case, the missing hoshi stone is black's Achilles' heel. directly.
In any case, the missing hoshi stone is black's Achilles' heel.
[diagram]

Diagram 13.5: Black fails
How about  ? This is similar to Diagram 12.2 and ? This is similar to Diagram 12.2 and  does make any difference. So why is this diagram repeated here? At
least one textbook I know mentions that external liberty is not a factor
to consider in this shape. I would like to argue against that
conclusion based on this diagram.
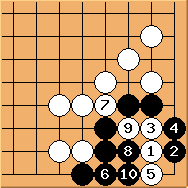
Diagram 13.6: Black alive!
In Diagram 13.5  is key point making a T-four killing shape to prevent black from playing 'a'.
If we modify the original problem a bit, giving black one liberty at each side,
 can play at the key point now and white cannot cut can play at the key point now and white cannot cut  .
Black would play .
Black would play  later to form a comfortable seki. later to form a comfortable seki.
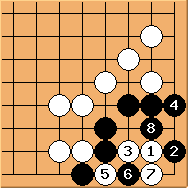
Diagram 13.7: Solution
So  is correct. is correct.
 is to enlarge the eyespace. is to enlarge the eyespace.
 is important to reduce eyespace from the other side. is important to reduce eyespace from the other side.
 has to make an eye to avoid Bulky Five so the result is a ko.
If playing has to make an eye to avoid Bulky Five so the result is a ko.
If playing  instead of instead of  , black would get the same result as in Diagram 13.2.
However, one can see if black wins the ko, current diagram is slightly better off for black.
That's what we take the extra miles to explain. , black would get the same result as in Diagram 13.2.
However, one can see if black wins the ko, current diagram is slightly better off for black.
That's what we take the extra miles to explain.
To summarise: there are multiple ways to form ko fights.
Diagram 13.2 is the best for both sides.
Diagram 13.7 may be better for black if there are additional liberties outside.
 Previous | Index | Next Previous | Index | Next 
|  Previous | Index | Next


 Previous | Index | Next
 is correct.
Because of the hane at first line, black has the leisure to play at key point
  , resulting in a ko fight.
 may play
  first, getting exactly the same result.
 directly.
In any case, the missing hoshi stone is black's Achilles' heel.
 does make any difference. So why is this diagram repeated here? At
least one textbook I know mentions that external liberty is not a factor
to consider in this shape. I would like to argue against that
conclusion based on this diagram.
  can play at the key point now and white cannot cut
  is correct.