 Previous | Index | Next Previous | Index | Next 
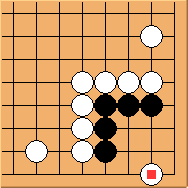
Diagram 5.1: Another tricky move
 is another famous tricky move. Of course black needs to prevent this
stone from getting home, but how? I will give the correct solution
first, then explain why other options won't work.
is another famous tricky move. Of course black needs to prevent this
stone from getting home, but how? I will give the correct solution
first, then explain why other options won't work.
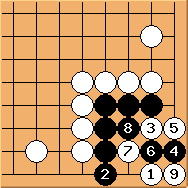
Diagram 5.2: Solution
First of all,  is a good move.
Its main purpose is to leave bigger eyespace in the corner to avoid killing shapes like Bulky Five. is a good move.
Its main purpose is to leave bigger eyespace in the corner to avoid killing shapes like Bulky Five.
 attempts to make an eye in the corner to form Eye versus No Eye capturing race.
But attempts to make an eye in the corner to form Eye versus No Eye capturing race.
But  is another tesuji.
White has no choice but blocking at is another tesuji.
White has no choice but blocking at  (if playing at 6 instead, black plays 5 and the corner is in seki, thanks for the big eyespace).
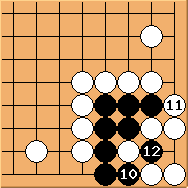
Diagram 5.3: Solution (continued)
Following the previous diagram, the conclusion is clearly
'connect-and-die' and black is unconditionally alive. Most textbooks
only give this solution but let's analyse some other possibilities.
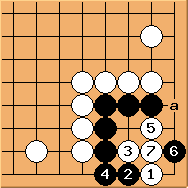
Diagram 5.4: Black fails
is incorrect.
Even if black can get  (which appears to be a key point),
the corner is simply a Bulky Five, because has wasted valuable eyespace.
If black plays 'a' instead of , white simple form an eye at 6. (which appears to be a key point),
the corner is simply a Bulky Five, because has wasted valuable eyespace.
If black plays 'a' instead of , white simple form an eye at 6.
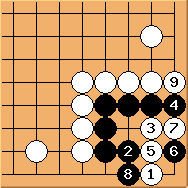
Diagram 5.5: Black fails too
here doesn't work either.
is good and white with an eye white wins the race easily.
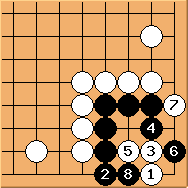
Diagram 5.6: Black still alive
Can white do something else instead of in the solution above?
What if white tries here? Black can live in seki.
If you have been following the series closely, such shape should look quite familiar now
(this shape is for example the same as Diagram 4.5 in Shape 4).
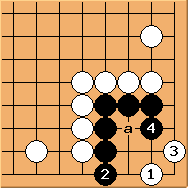
Diagram 5.7: Black still alive
Since in the Solution diagram is such a good move,
can occupy the spot first? is calm.
It does not matter that white can form an eye here as long as black also gets any eye at 'a'.
Please verify that black is still alive.
To summarise, there is no ko involved in this shape.
If black knows how to punish white's tricky move black can live unconditionally.
Previous | Index | Next
|