| All you need to know about Carpenter's Square-32 |
|---|
 Previous | Index | Next Previous | Index | Next  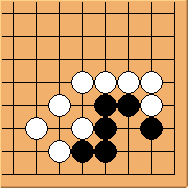 Diagram 32.1: White to play Because of the external liberty, a ko would be an acceptable outcome for white. 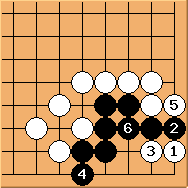 Diagram 32.2: Solution 1 The 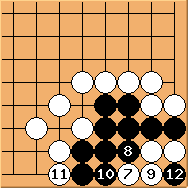 Diagram 32.3: Solution 1 (continued)
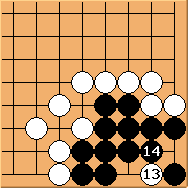 Diagram 32.4: Solution 1 (continued)
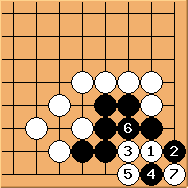 Diagram 32.5: Solution 2 This sequence is exactly the same as in Diagram 31.4. This is the second solution. Conclusion: White has two ways to start a ko fight. The solution in Diagram 32.4 is marginally better for white as both bottom and right sides have already been blocked if black eventually wins the ko. Previous | Index | Next |
 tesuji still works.
However because of the external liberty, white can no longer follow the sequence in Diagram 31.3.
Please consider what's next?
tesuji still works.
However because of the external liberty, white can no longer follow the sequence in Diagram 31.3.
Please consider what's next? is the magic move.
It is amazing that white can arrange to give up 4 stones first ......
is the magic move.
It is amazing that white can arrange to give up 4 stones first ......  is an atari so black has to form a ko. This completes the first solution.
This also demonstrates that if there are 2 or more external liberties black can live unconditionally using oshi-tsubushi.
is an atari so black has to form a ko. This completes the first solution.
This also demonstrates that if there are 2 or more external liberties black can live unconditionally using oshi-tsubushi.