 Previous | Index | Next Previous | Index | Next 
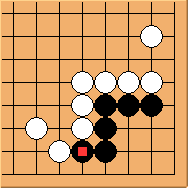
Diagram 11.1: White to play
How does the extra bend at  affect the outcome? affect the outcome?
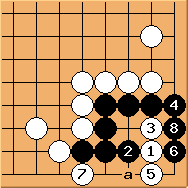
Diagram 11.2: Solution 1
 is normally not a good move in standard Carpenter's square shapes covered earlier but it is good now. is normally not a good move in standard Carpenter's square shapes covered earlier but it is good now.
 is important to help form a seki.
If is important to help form a seki.
If  plays 8 instead, black simply plays 'a' and white is one liberty too short in the capturing race. plays 8 instead, black simply plays 'a' and white is one liberty too short in the capturing race.
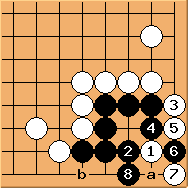
Diagram 11.3: Solution 2
If white plays  black needs to be careful. black needs to be careful.
 is a calm move. In the end 'a' and 'b' are miai so black is unconditionally alive. is a calm move. In the end 'a' and 'b' are miai so black is unconditionally alive.
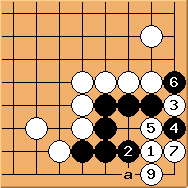
Diagram 11.4: Black fails (8=3)
If black is tricked into playing ,
following  and , both forcing moves, and , both forcing moves,  is good.
Black can win the capturing race by playing 'a' but that is a T-four dead shape.
So black corner is completely dead. is good.
Black can win the capturing race by playing 'a' but that is a T-four dead shape.
So black corner is completely dead.
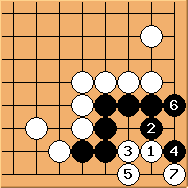
Diagram 11.5: Black fails too
from the other side is normally incorrect.
is the best point.
Apart from , playing anywhere else would result in a big-eye killing shape (please verify).
So there is a messy ko fight now.
In practice, if black isn't happy with Solution 1 (where all his points are gone), and he has plenty of ko threats,
it may be worthwhile to try this diagram. This corner is a two-stage ko, and for black to win an approach move is needed.
So winning this ko won't be easy for either side, a good way for black to complicate situations on the board.
Conclusion: Black's corner should be unconditionally alive, unless he chooses other options.
Previous | Index | Next
|